
 Materials: 1 skein aran/worsted weight yarn (for these hats I used Malabrigo Worsted in chestnut and natural) in any bear color you like (I always make a mixture of Brown, Grizzly, Polar bears). A small amount of the same weight yarn in a constrasting color. One 4.5mm (US size 7) 60 cm (24 inch) circular knitting needle. One set of 4.5 (US size 7) double pointed knitting needles. 4 stitch holders OR 4 extra double pointed needles. One stitch marker.
Guage: 18 stitches to 4 inches on 4.5mm needles with single-held yarn in stockinette stitch.
Size: Adult One Size fits Most, Child Size Age 2-10 (in brackets)
Skills needed: Casting on, Casting off, Knitting in the round, Knitting on double pointed needles, 3 needle bind-off.
 Instructions:
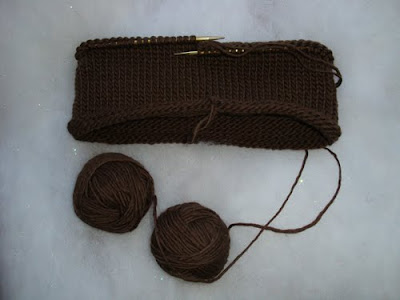
Wind your skein of yarn into two balls, roughly the same size. You will be using one strand from each ball, held together, to make the bear hat. It should look like this:

Make hat rim:

Make hat rim:
Cast on 82 (74) stitches onto the circular needle holding 2 strand together for each stitch cast on. Join the ends, being careful not to twist, and place marker at the join. Knit 2 rows, Purl 2 rows. Your knitting should look like this:


Knit body of hat: Continue knitting in the round, replacing marker when you come to it, until your knitting measures 4 inches from the cast-on edge. Your knitting should look like this:
Split hat for ears:

Continue the body of the hat:
 Continue knitting in the round and slipping stiches until you have a total of 16 (14) stitches on each holder/dpn and 9 (6) stitches in the middle. End your round when your reach the stitch holder.
Your knitting should look like this:

Knit the middle of the hat:


Split hat for ears:
Starting at marker, Knit 40 (36), slip next two stitches on SEPERATE stitch holders or double-pointed needles, Knit 39 (35), slip the next two stitches on SEPERATE stitch holders or double pointed needles.
Note: When you slip the stitches on dpns or stitch holders, slip the first one purlwise and the second one knitwise. That way the stitches will face each other and not get twisted.
Your knitting should look like this:

Continue the body of the hat:
Knit in the round, slipping 4 stitches onto stitch holders (1 on each) every time you complete a round. Once again, the stiches you slip to should be connected to, and facing each other on the holders, and you'll continue knitting in the round the stitches you do not slip. Like this:
 Continue knitting in the round and slipping stiches until you have a total of 16 (14) stitches on each holder/dpn and 9 (6) stitches in the middle. End your round when your reach the stitch holder.
Your knitting should look like this:

Knit the middle of the hat:
At this point, if you're using stitch holders, put the stitches on the closest ear onto double pointed needles. Also, put your circular stitches onto double pointed needles. They'll be much easier to work with.
Slip 2 stitches from EACH ear (8 total) back onto the double pointed needles that hold your middle stitches. Pull your yarn through these stitches to the end. Like this:

Bind off middle stitches:
Now knit across the middle stitches by knitting 2 stiches together - one from the back, one from the front, and binding off as you go. This is called the 3 needle bind-off, and HERE is a good video if you're confused. You should now have one stitch left on the middle needle, and 14 (12) on each ear.
Your knitting should look like this:

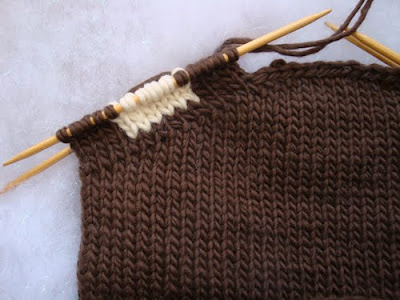
Bind off the stitch on your middle needle with the first stitch on the ear, then knit around the ear with main color - 1 row, 16 stitches each side. Row 2 of ear: Knit 4 (3) of main color, Knit 6 stitches of contrasting color, Knit 4 (3) of main color. Repeat on 2nd side of ear.
Row 3 & 4 of ear: Same as Row 2
Row 5 of ear: Knit 5 (4) of main color, Knit 4 stitches of contrasting color, Knit 5 (4) of main color.
Your knitting should look like this:
 Row 6 of ear: Break off contrasting colour with 4 inches left, pull contrasting yarn through ear to main body of hat. With main color, continue to work around ear, binding off one stitch on each side of each ear (4 stitches per round) until 4 stitches remain on side. Bind off stitches as you did for the middle stitches using a 3 needle bind off. When one stitch remains on the needle, cut yarn with 6 inches left, pull the remaining yarn taught through the last stitch through the ear to the main body of the hat.
 Reconnect yarn for second year: Pull yarn through hole between first and second stitch in middle section. Like this:
 Pull stitch taught to first stitch on second ear and work ear same as first. Once complete, pull extra yarn through ear to body of hat. Turn hat inside out and tie off all loose ends from ears on the inside. Like this:
 Tie off the first stitch, and weave in the ends on the inside of your hat. Turn hat right side out, and ENJOY! You've done it! If you've found any mistakes in the pattern, please email Holly@HollyKlein.com. Send me a photo of your bear hats, I'd love to see them. Could they be as cute as this one?
8 comments:
Thank you for the pattern.
THanks! These are adorable!
Thanks! I've looked around and this is the cutest by far for bear hats! Now I just have to learn how to use double pointed needles...
I am a beginner knitter but have tackled some cable patterns I have done slip stitches,, yarn over stitches and a few patterns that weren't classed as easy but reading this pattern boggles my mind. I can't get the hang of double pointed needles. I've knit in the round using circular needles and have used stitch holders to cable so why use DPNS? this is very confusing
I am having some problems ... I have knit this hat twice and both times the ears have ended up twisted. When you slip stitches onto the dpns for the ears, the pattern says "slip next two stitches..." I slipped the next two stitches (the stitches on the needle on the left). Was I meant to slip one from one needle and one from the other? I do love these hats and really want to make one that looks right :)
Hi, Holly. Thanks for the great pattern, I want to knit this for my Grand Son but vary it slightly and wanted your advice, I want to make the main body of the hat in Loopy Stitch to give a real "Bear feel" so I think I need to do the first few rows in Garter Stitch so the loops hang down rather than the furled rim. Will this affect the shape and fit? Thanking you in advance for your help. Heather
Believe it or not, I have a 19 year old who wants a 'bear' hat. Bear has been her nickname since birth. How could I adjust the pattern for an adult? ross.burk@sympatico.ca
Oh where oh where have I gone wrong?
I casted on 74 stitches.
I have just finished knitting up to 4 inches.
I am supposed to knit 36 stitches and then put to 2 stitches (on separate holders)
Knit 35 and place 2 more stitches on their separate holder.
35+2+36+2=75
Should I just knit 2 35 stitches and forget about it, or am I not understanding something?
Post a Comment