When Mr. Furly (who is a beaver) wants to disguise himself, he uses one of my homemade bear hats! I'veknitted so many of them for friends of all ages, and have finally put together a step-by-step picturial tutorial so any Beginner Knitter can make one for their winter hibernation. I hope you'll try it, and enjoy!
 Materials: 1 skein aran/worsted weight yarn (for these hats I used Malabrigo Worsted in chestnut and natural) in any bear color you like (I always make a mixture of Brown, Grizzly, Polar bears). A small amount of the same weight yarn in a constrasting color. One 4.5mm (US size 7) 60 cm (24 inch) circular knitting needle. One set of 4.5 (US size 7) double pointed knitting needles. 4 stitch holders OR 4 extra double pointed needles. One stitch marker.
Guage: 18 stitches to 4 inches on 4.5mm needles with single-held yarn in stockinette stitch.
Size: Adult One Size fits Most, Child Size Age 2-10 (in brackets)
Skills needed: Casting on, Casting off, Knitting in the round, Knitting on double pointed needles, 3 needle bind-off.
 Instructions:
Wind your skein of yarn into two balls, roughly the same size. You will be using one strand from each ball, held together, to make the bear hat. It should look like this:
 Make hat rim:
Cast on 82 (74) stitches onto the circular needle holding 2 strand together for each stitch cast on. Join the ends, being careful not to twist, and place marker at the join. Knit 2 rows, Purl 2 rows. Your knitting should look like this:

Knit body of hat: Continue knitting in the round, replacing marker when you come to it, until your knitting measures 4 inches from the cast-on edge. Your knitting should look like this: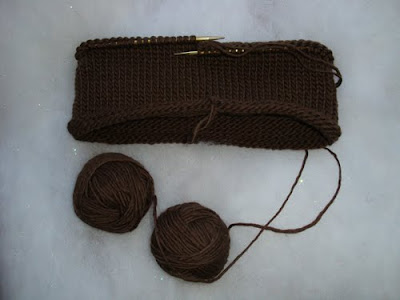 Split hat for ears:
Starting at marker, Knit 40 (36), slip next two stitches on SEPERATE stitch holders or double-pointed needles, Knit 39 (35), slip the next two stitches on SEPERATE stitch holders or double pointed needles.
Note: When you slip the stitches on dpns or stitch holders, slip the first one purlwise and the second one knitwise. That way the stitches will face each other and not get twisted.
Your knitting should look like this:
 Continue the body of the hat:
Knit in the round, slipping 4 stitches onto stitch holders (1 on each) every time you complete a round. Once again, the stiches you slip to should be connected to, and facing each other on the holders, and you'll continue knitting in the round the stitches you do not slip. Like this:
 Continue knitting in the round and slipping stiches until you have a total of 16 (14) stitches on each holder/dpn and 9 (6) stitches in the middle. End your round when your reach the stitch holder.
Your knitting should look like this: Knit the middle of the hat:
At this point, if you're using stitch holders, put the stitches on the closest ear onto double pointed needles. Also, put your circular stitches onto double pointed needles. They'll be much easier to work with.
Slip 2 stitches from EACH ear (8 total) back onto the double pointed needles that hold your middle stitches. Pull your yarn through these stitches to the end. Like this:
Bind off middle stitches:
Now knit across the middle stitches by knitting 2 stiches together - one from the back, one from the front, and binding off as you go. This is called the 3 needle bind-off, and
HERE is a good video if you're confused. You should now have one stitch left on the middle needle, and 14 (12) on each ear.
Your knitting should look like this:
 Start the first ear:
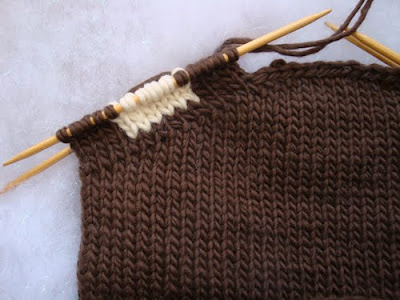
Bind off the stitch on your middle needle with the first stitch on the ear, then knit around the ear with main color - 1 row, 16 stitches each side. Row 2 of ear: Knit 4 (3) of main color, Knit 6 stitches of contrasting color, Knit 4 (3) of main color. Repeat on 2nd side of ear.
Row 3 & 4 of ear: Same as Row 2Row 5 of ear: Knit 5 (4) of main color, Knit 4 stitches of contrasting color, Knit 5 (4) of main color.Your knitting should look like this:
 Row 6 of ear: Break off contrasting colour with 4 inches left, pull contrasting yarn through ear to main body of hat. With main color, continue to work around ear, binding off one stitch on each side of each ear (4 stitches per round) until 4 stitches remain on side. Bind off stitches as you did for the middle stitches using a 3 needle bind off. When one stitch remains on the needle, cut yarn with 6 inches left, pull the remaining yarn taught through the last stitch through the ear to the main body of the hat.
 Reconnect yarn for second year: Pull yarn through hole between first and second stitch in middle section. Like this:

 I put a label in the lapel, just like they do on real jackets. I toyed around with the idea of an inside pocket, with a tiny golf pencil or mini pen, though not really age appropriate for a toddler...
 I'm in love with the vintage pattern.It highlights another look I think all children should be sporting. Mr. Jones, who has a history of figure drawing, points out that many of the children's legs are too long for their babyish heads. Supermodel babies of the 1970s!


